Cloud-Based Remote Sensing with Google Earth Engine

Fundamentals and Applications

Part F6: Advanced Topics
Although you now know the most basic fundamentals of Earth Engine, there is still much more that can be done. The Part presents some advanced topics that can help expand your skill set for doing larger and more complex projects. These include tools for sharing code among users, scaling up with efficient project design, creating apps for non-expert users, and combining R with other information processing platforms.
Chapter F6.1: Collaborating in Earth Engine with Scripts and Assets
Author
Sabrina H. Szeto
Overview
Many users find themselves needing to collaborate with others in Earth Engine at some point. Students may need to work on a group project, people from different organizations might want to collaborate on research together, or people may want to share a script or an asset they created with others. This chapter will show you how to collaborate with others and share your work.
Learning Outcomes
- Understanding when it is important to share a script or asset.
- Understanding what roles and permission options are available.
- Sharing a script with others.
- Sharing an asset with others.
- Sharing an asset so it can be displayed in an app.
- Sharing a repository with others.
- Seeing who made changes to a script and what changes were made.
- Reverting to a previous version of a script.
- Using the require function to load modules.
- Creating a script to share as a module.
Assumes you know how to:
- Sign up for an Earth Engine account, open the Code Editor, and save your script (Chap. F1.0).
Github Code link for all tutorials
This code base is collection of codes that are freely available from different authors for google earth engine.
Introduction to Theory
Many people find themselves needing to share a script when they encounter a problem; they wish to share the script with someone else so they can ask a question. When this occurs, sharing a link to the script often suffices. The other person can then make comments or changes before sending a new link to the modified script.
If you have included any assets from the Asset Manager in your script, you will also need to share these assets in order for your script to work for your colleague. The same goes for sharing assets to be displayed in an app.
Another common situation involves collaborating with others on a project. They may have some scripts they have written that they want to reuse or modify for the new project. Alternatively, several people might want to work on the same script together. For this situation, sharing a repository would be the best way forward; team members will be able to see who made what changes to a script and even revert to a previous version.
If you or your group members find yourselves repeatedly reusing certain functions for visualization or for part of your analysis, you could use the require module to call that function instead of having to copy and paste it into a new script each time. You could even make this function or module available to others to use via require.
Practicum
Let’s get started. For this lab, you will need to work in small groups or pairs.
Section 1. Using Get Link to Share a Script
Copy and paste the following code into the Code Editor.
print('The author of this script is MyName.'); |
Replace MyName with your name, then click on Save to save the script in your home repository. Next, click on the Get Link button and copy the link to this script onto your clipboard. Using your email program of choice, send this script to one of your group members.
Now add the following code below the line of code that you pasted earlier.
print('I just sent this script to GroupMemberName.'); |
Replace GroupMemberName with the name of the person you sent this script to, then save the script again. Next, click on the Get Link button and copy the link to this script onto your clipboard. Using your email program of choice, send this script to the same person.
Question 1. You should also have received two emails from someone in your group who is also doing this exercise. Open the first and second links in your Code Editor by clicking on them. Is the content of both scripts the same?
Answer: No, the scripts will be different, because Get Link sends a snapshot of the script at a particular point in time. Thus, even though the script was updated, the first link does not reflect that change.
Question 2. What happens when you check the box for Hide code panel or Disable auto-run before sharing the script?
Answer. Hide code panel will minimize the code panel so the person you send the script to will see the Map maximized. This is useful when you want to draw the person’s attention to the results rather than to the code. To expand the code panel, they have to click on the Show code button. Disable auto-run is helpful when you do not want the script to start running when the person you sent it to opens it. Perhaps your script takes very long to run or requires particular user inputs and you just want to share the code with the person.
Section 2. Sharing Assets from Your Asset Manager
When you clicked the Get Link button earlier, you may have noticed a note in the popup reading: “To give others access to assets in the code snapshot, you may need to share them.” If your script uses an asset that you have uploaded into your Asset Manager, you will need to share that asset as well. If not, an error message will appear when the person you shared the script with tries to run it.
Before sharing an asset, think about whether you have permission to share it. Is this some data that is owned by you, or did you get it from somewhere else? Do you need permission to share this asset? Make sure you have the permission to share an asset before doing so.
Now, let’s practice sharing assets. First, navigate to your Asset Manager by clicking on the Assets tab in the left panel. If you already have some assets uploaded, pick one that you have permission to share. If not, upload one to your Asset Manager. If you don’t have a shapefile or raster to upload, you can upload a small text file. Consult the Earth Engine documentation for how to do this; it will take only a few steps.
Hover your cursor over that asset in your Asset Manager. The asset gets highlighted in gray and three buttons appear to the right of the asset. Click on the first button from the left (outlined in red in Fig. F6.1.1). This icon means “share.”
Fig. F6.1.1 Three assets in the Asset Manager |

After you click the share button, a Share Image popup will appear (Fig. F6.1.2). This popup contains information about the path of the asset and the email address of the owner. The owner of the asset can decide who can view and edit the asset.
Click on the dropdown menu outlined in red in Fig. F6.1.2. You will see two options for permissions: Reader and Writer. A Reader can view the asset, while a Writer can both view and make changes to it. For example, a Writer could add a new image to an ImageCollection. A Writer can also add other people to view or edit the asset, and a Writer can delete the asset. When in doubt, give someone the Reader role rather than the Writer role.
Fig. F6.1.2 The Share Image popup window |
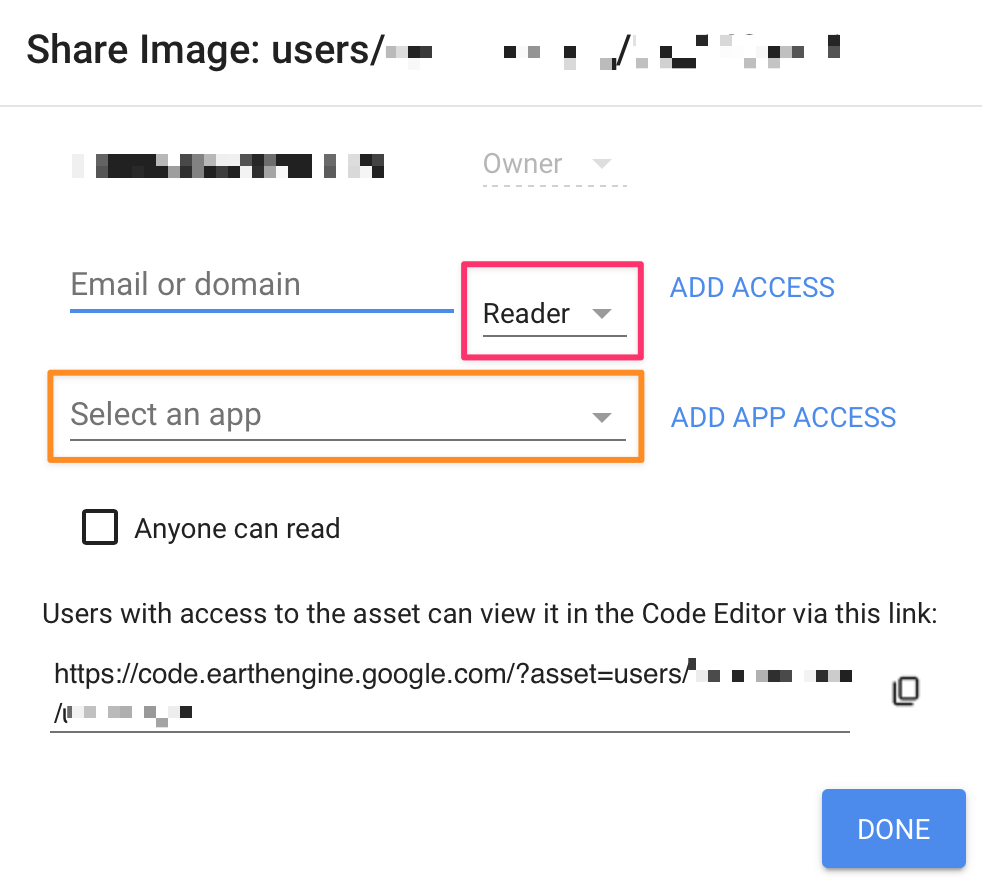
To share an asset with someone, you can type their email address into the Email or domain text field, choose Reader or Writer in the dropdown menu, and then click on Add Access. You can also share an asset with everyone with a certain email domain, which is useful if you want to share an asset with everyone in your organization, for instance.
If you want to share reading access publicly, then check the box that says Anyone can read. Note that you still need to share the link to the asset in order for others to access it. The only exceptions to this are when you are using the asset in a script and sharing that script using the Get Link button or when you share the asset with an Earth Engine app. To do the latter, use the Select an app dropdown menu (outlined in orange in Fig. F6.1.2) and click Add App Access.
Question 3. Share an asset with a group member and give them reader access. Send them the link to that asset. You will also receive a link from someone else in your group. Open that link. What can you do with that asset? What do you need to do to import it into a script?
Answer: You can view details about the asset and import it for use in a script in the Code Editor. To import the asset, click on the blue Import button.
Question 4. Share an asset with a group member and give them writer access. Send them the link to that asset. You will also receive a link from someone else in your group. Open that link. What can you do with that asset? Try sharing the asset with a different group member.
Answer: You can view details about the asset and import it for use in a script in the Code Editor. You can also share the asset with others and delete the asset.
Section 3. Working with Shared Repositories
Now that you know how to share assets and scripts, let’s move on to sharing repositories. In this section, you will learn about different types of repositories and how to add a repository that someone else shared with you. You will also learn how to view previous versions of a script and how to revert back to an earlier version.
Earlier, we learned how to share a script using the Get Link button. This link shares a code snapshot from a script. This snapshot does not reflect any changes made to the script after the time the link was shared. If you want to share a script that updates to reflect the most current version when it is opened, you need to share a repository with that script instead.
If you look under the Scripts tab of the leftmost panel in the Code Editor, you will see that the first three categories are labeled Owner, Reader, and Writer.
- Repositories categorized under Owner are created and owned by you. No one else has access to view or make changes to them until you share these repositories.
- Repositories categorized under Reader are repositories to which you have reader access. You can view the scripts but not make any changes to them. If you want to make any changes, you will need to save the script as a new file in a repository that you own.
- Repositories categorized under Writer are repositories to which you have writer access. This means you can view and make changes to the scripts.
Let’s practice creating and sharing repositories. We will start by making a new repository. Click on the red New button located in the left panel. Select Repository from the dropdown menu. A New repository popup window will open (Fig. F6.1.3).
Fig. F6.1.3 The New repository popup window |

In the popup window’s text field, type a name for your new repository, such as “ForSharing1,” then click on the blue Create button. You will see the new repository appear under the Owner category in the Scripts tab (Fig. F6.1.4).
Now, share this new repository with your group members: Hover your cursor over the repository you want to share. The repository gets highlighted in gray, and three buttons appear. Click on the Gear icon (outlined in red in Fig. F6.1.4).
Fig. F6.1.4 Three repositories under the Owner category |

A Share Repo popup window appears (Fig. F6.1.5) which is very similar to the Share Image popup window we saw in Fig. F6.1.2. The method for sharing a repository with a specific user or the general public is the same as for sharing assets.
Type the email address of a group member in the Email or domain text field and give this person a writer role by selecting Writer in the dropdown menu, then click on Add Access.
Fig. F6.1.5. The Share Repo popup window |

Your group member should receive an email inviting them to edit the repository. Check your email inbox for the repository that your group member has shared with you. When you open that email, you will see content similar to what is shown in Fig. F6.1.6.
Fig. F6.1.6 The “Invitation to edit” email |
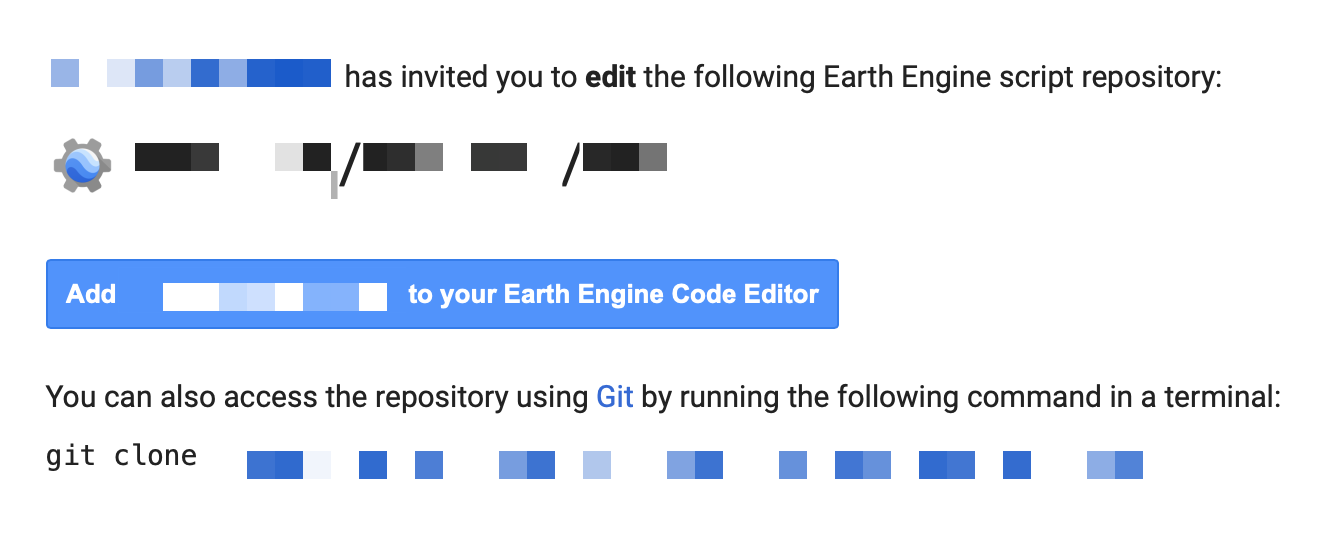
Now, click on the blue button that says Add [repository path] to your Earth Engine Code Editor. You will find the new repository added to the Writer category in your Scripts tab. The repository path will contain the username of your group member, such as users/username/sharing.
Now, let’s add a script to the empty repository. Click on the red New button in the Scripts tab and select File from the dropdown menu. A Create file popup will appear, as shown in Fig. F6.1.7. Click on the gray arrow beside the default path to open a dropdown menu that will allow you to choose the path of the repository that your group member shared with you. Type a new File Name in the text field, such as “exercise,” then click on the blue OK button to create the file.
Fig. F6.1.7 The Create file popup window |

A new file should now appear in the shared repository in the Writer category. If you don’t see it, click on the Refresh icon, which is to the right of the red New button in the Scripts tab.
Double-click on the new script in the shared repository to open it. Then, copy and paste the following code to your Code Editor.
print('The owner of this repository is GroupMemberName.'); |
Replace GroupMemberName with the name of your group member, then click Save to save the script in the shared repository, which is under the Writer category.
Now, navigate to the repository under Owner which you shared with your group member. Open the new script which they just created by double-clicking it.
Add the following code below the line of code that you pasted earlier.
print('This script is shared with MyName.'); |
Replace MyName with your name, then save the script.
Next, we will compare changes made to the script. Click on the Versions icon (outlined in red in Fig. F6.1.8).
Fig. F6.1.8 Changes made and previous versions of the script |

A popup window will appear, titled Revision history, followed by the path of the script (Fig. F6.1.9). There are three columns of information below the title.
- The left column contains the dates on which changes have been made.
- The middle column contains the usernames of the people who made changes.
- The right column contains information about what changes were made.
The most recent version of the script is shown in the first row, while previous versions are listed in subsequent rows. (More advanced users may notice that this is actually a Git repository.)
Fig. F6.1.9 The Revision history popup window |
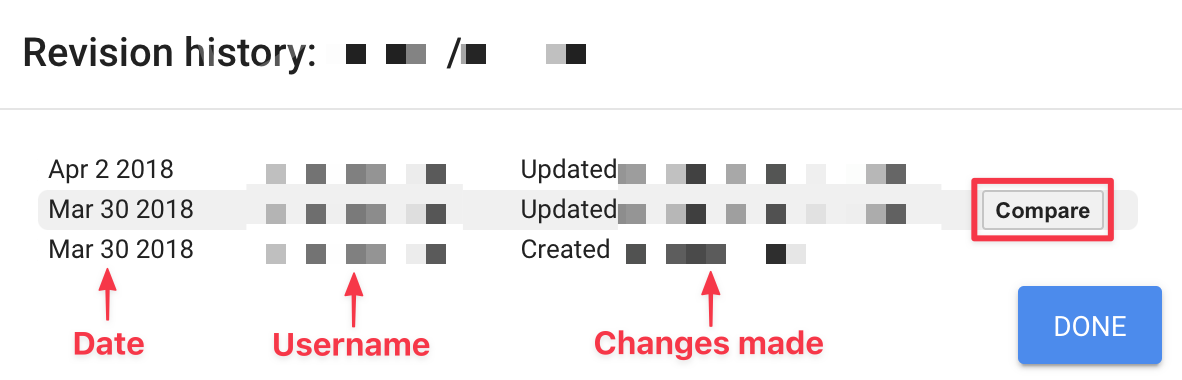
If you hover your cursor over a row, the row will be highlighted in gray and a button labeled Compare will appear. Clicking on this button allows you to compare differences between the current version of the script and a previous version in a Version comparison popup window (Fig. F6.1.10).
Fig. F6.1.10 The Version comparison popup window |

In the Version comparison popup, you will see text highlighted in two different colors. Text highlighted in red shows code that was present in the older version but is absent in the current version (the “latest commit”). Text highlighted in green shows code that is present in the current version but that was absent in the older version. Generally speaking, text highlighted in red has been removed in the current version and text highlighted in green has been added to the current version. Text that is not highlighted shows code that is present in both versions.
Question 5. What text, if any, is highlighted in red when you click on Compare in your “exercise” script?
Answer: No text is highlighted in red, because none was removed between the previous and current versions of the script.
Question 6. What text, if any, is highlighted in green when you click on Compare in your “exercise” script?
Answer: print('This script is shared with MyName.');
Question 7. What happens when you click on the blue Revert button?
Answer: The script reverts to the previous version, in which the only line of code is
print('The owner of this repository is GroupMemberName.'); |
Section 4. Using the Require Function to Load a Module
In earlier chapters, you may have noticed that the require function allows you to reuse code that has already been written without having to copy and paste it into your current script. For example, you might have written a function for cloud masking that you would like to use in multiple scripts. Saving this function as a module enables you to share the code across your own scripts and with other people. Or you might discover a new module with capabilities you need written by other authors. This section will show you how to use the require function to create and share your own module or to load a module that someone else has shared.
The module we will use is ee-palettes, which enables users to visualize raster data using common specialized color palettes (Donchyts et al. 2019). (If you would like to learn more about using these color palettes, the ee-palettes module is described and illustrated in detail in Chap. F6.0.) The first step is to go to this link to accept access to the repository as a reader: https://code.earthengine.google.com/?accept_repo=users/gena/packages
Now, if you navigate to your Reader directory in the Code Editor, you should see a new repository called 'users/gena/packages' listed. Look for a script called 'palettes' and click on it to load it in your Code Editor.
If you scroll down, you will see that the script contains a nested series of dictionaries with lists of hexadecimal color specifications (as described in Chap. F2.1) that describe a color palette, as shown in the code block below. For example, the color palette named “Algae” stored in the cmocean variable consists of seven colors, ranging from dark green to light green (Fig. F6.1.11).
exports.cmocean ={ |
Notice that the variable is named exports.cmocean. Adding exports to the name of a function or variable makes it available to other scripts to use, as it gets added to a special global variable (Chang 2017).
Fig. F6.1.11 Some of the color palettes from the ee-palettes GitHub repository |

To see all the color palettes available in this module, go to https://github.com/gee-community/ee-palettes.
Now let’s try using the ee-palettes module. Look for a script in the same repository called 'palettes-test' and click on it to load it in your Code Editor. When you run the script, you will see digital elevation data from the National Aeronautics and Space Administration Shuttle Radar Topography Mission satellite visualized using two palettes, colorbrewer.Blues and cmocean.Algae. The map will have two layers that show the same data with different palettes.
The script first imports the digital elevation model data in the Imports section of the Code Editor.
var dem=ee.Image('USGS/SRTMGL1_003'); |
The script then loads the ee-palettes module by using the require function. The path to the module, 'users/gena/packages:palettes', is passed to the function. The require function is then stored in a variable named 'palettes', which will be used later to obtain the palettes for data visualization.
var palettes=require('users/gena/packages:palettes'); |
As described by Donchyts et al. (2019), “Each palette is defined by a group and a name, which are separated by a period (JS object dot notation), and a color level. To retrieve a desired palette, use JS object notation to specify the group, name, and number of color levels.” We define the color palette Algae as palettes.cmocean.Algae[7] because it is part of the group cmocean and has 7 color levels. In the next code block, you can see that the palettes (i.e., lists of hex colors) have been defined for use by setting them as the value for the palette key in the visParams object supplied to the Map.addLayer function.
// colorbrewer |
Question 8. Try adding a third layer to the Map with a different color palette from ee-palettes. How easy was it to do?
Now that you have loaded and used a module shared by someone else, you can try your hand at creating your own module and sharing it with someone else in your group. First, go to the shared repository that you created in Sect. 3, create a new script in that repository, and name it “cloudmasking.”
Then, go to the Examples repository at the bottom of the Scripts tab and select a function from the Cloud Masking repository. Let’s use the Landsat8 Surface Reflectance cloud masking script as an example. In that script, you will see the code shown in the block below. Copy all of it into your empty script.
// This example demonstrates the use of the Landsat 8 Collection 2, Level 2 |
Note that this code is well commented and has a header that describes what the script does. Don’t forget to comment your code and describe what you are doing each step of the way. This is a good practice for collaborative coding and for your own future reference.
Imagine that you changed this maskL8sr function slightly for some reason and want to make it available to other users and scripts. To do that, you can turn the function into a module. Copy and modify the code from the example code into the new script you created called “cloudmasking.” (Hint: Store the function in a variable starting with exports. Be careful that you don’t accidentally use Export, which is used to export datasets.)
Your script should be similar to the following code.
exports.maskL8sr =function(image){ |
Next, you will create a test script that makes use of the cloud masking module you just made. Begin by creating a new script in your shared repository called “cloudmasking-test.” You can modify the last part of the example cloud masking script to use your module.
// Map the function over one year of data. |
Question 9. How will you modify the cloud masking script to use your module? What does the script look like?
Answer: Your code might look something like the code block below.
// Load the module |
Synthesis
Apply what you learned in this chapter by setting up a shared repository for your project, lab group, or organization. What scripts would you share? What permissions should different users have? Are there any scripts that you would turn into modules?
Conclusion
In this chapter, you learned how to collaborate with others in the Earth Engine Code Editor through sharing scripts, assets, and repositories. You learned about different roles and permissions available for sharing and when it is appropriate to use each. In addition, you are now able to see what changes have been made to a script and revert to a previous version. Lastly, you loaded and used a module that was shared with you and created your own module for sharing. You are now ready to start collaborating and developing scripts with others.
Feedback
To review this chapter and make suggestions or note any problems, please go now to bit.ly/EEFA-review. You can find summary statistics from past reviews at bit.ly/EEFA-reviews-stats.
References
Cloud-Based Remote Sensing with Google Earth Engine. (n.d.). CLOUD-BASED REMOTE SENSING WITH GOOGLE EARTH ENGINE. https://www.eefabook.org/
Cloud-Based Remote Sensing with Google Earth Engine. (2024). In Springer eBooks. https://doi.org/10.1007/978-3-031-26588-4
Chang A (2017) Making it easier to reuse code with Earth Engine script modules. In: Google Earth and Earth Engine. https://medium.com/google-earth/making-it-easier-to-reuse-code-with-earth-engine-script-modules-2e93f49abb13. Accessed 24 Feb 2022
Donchyts G, Baart F, Braaten J (2019) ee-palettes. https://github.com/gee-community/ee-palettes. Accessed 24 Feb 2022